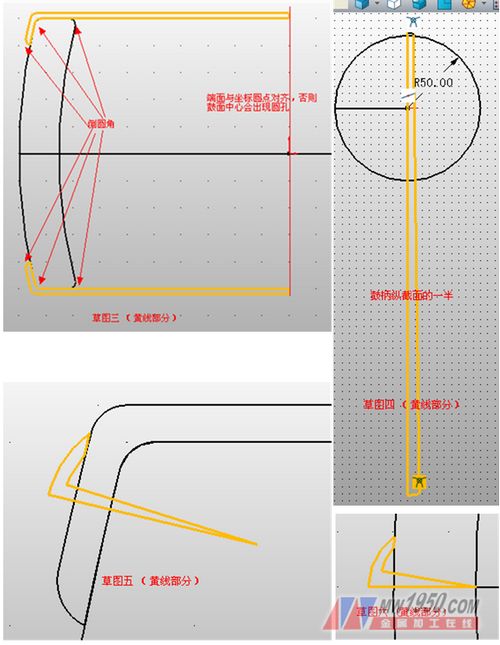
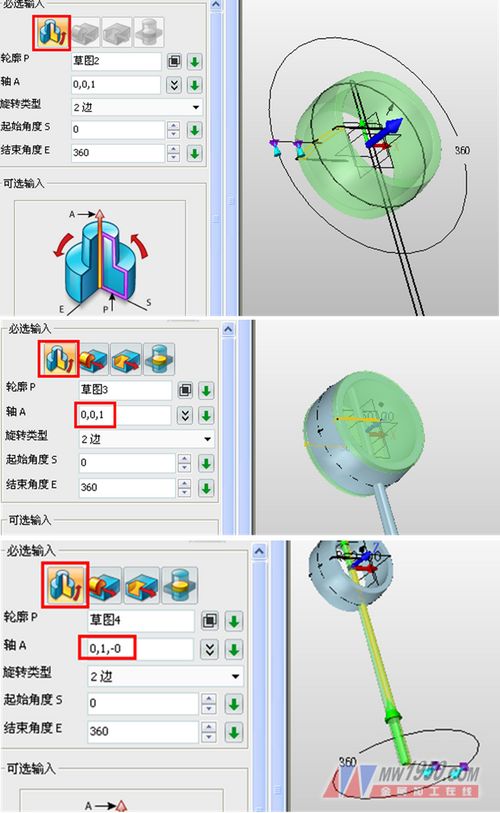
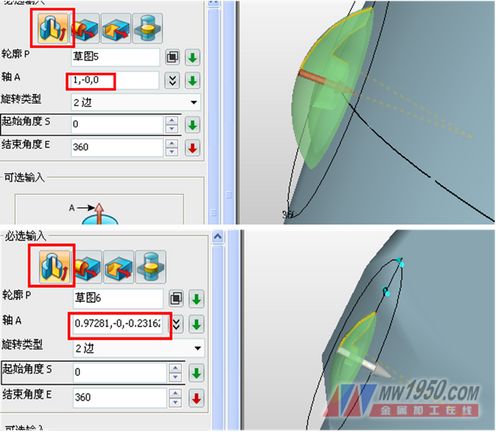
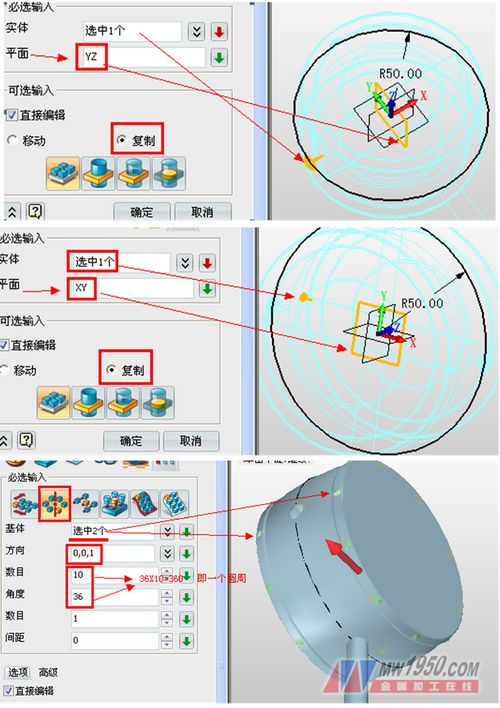
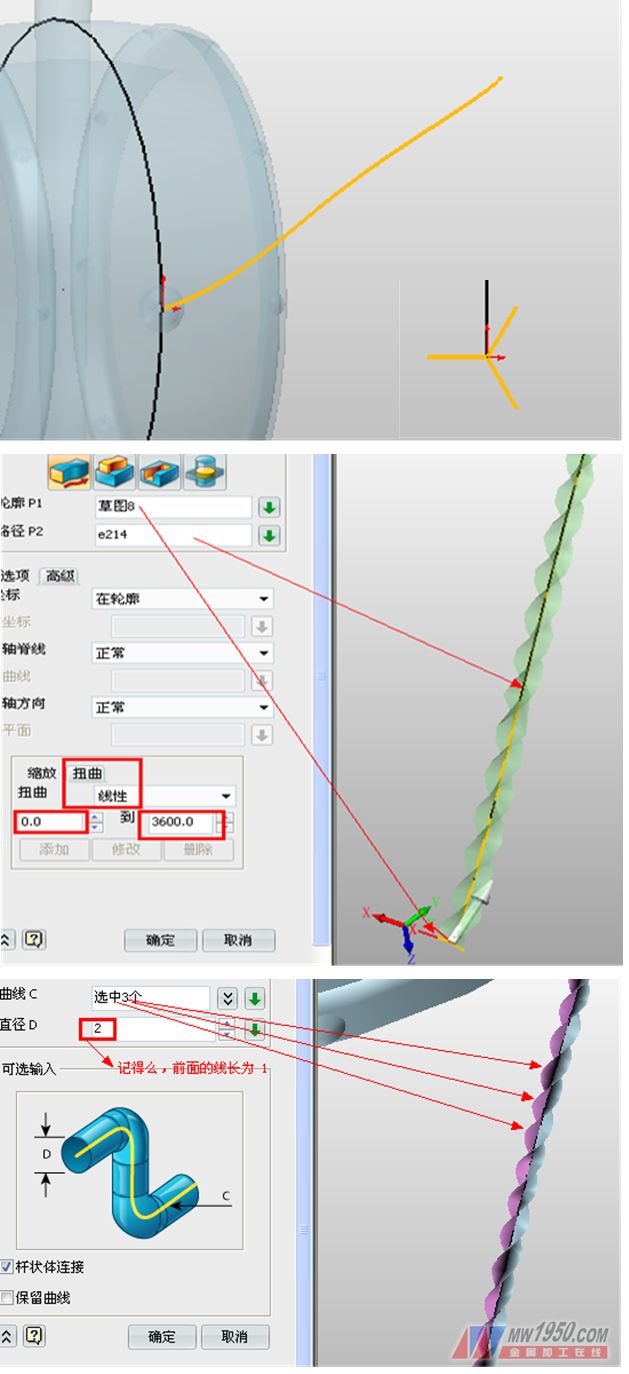
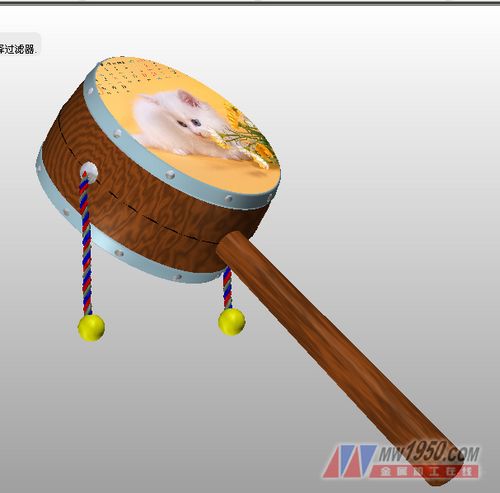
The winners of Zhongwang 3D2012 looking for childhood surprises were invited to share their CAD design work, the 3D CAD work of the rattle. The CAD design of the rattle is mainly composed of four parts: the drum body, the drum head, the drum hammer and the drum handle. The CAD design can be quickly completed by the common rotating tool of Zhongwang 3D, which is as simple, convenient and intuitive as the child builds the building block. Hope 3D easy to learn and use features, can help beginners quickly master 3D CAD design skills. Next, we will introduce you to the 3D CAD modeling of the rattle: The first step: drawing a sketch In order to be intuitive, the author draws the sketches in a centralized manner, and the size can be determined by himself, as long as the ratio is appropriate. Sketch 1: (diameter of the drum) Insert a sketch in the XY plane and make a circle with a diameter of 100 from the origin of the coordinate. This sketch is mainly used as a reference for the position of the sketch later, or it is not necessary. Sketch 2: (section of the drum) Insert a sketch in the XZ plane and obtain the skeleton of the drum by rotating. Sketch 3: (section of the drumhead) Insert a sketch in the XZ plane. The two drumheads are symmetrical, and it is also convenient to make them. Two drumheads are obtained by rotation. You can also make a drumhead and then mirror another drumhead. The result is the same. Sketch 4: (section of the drum handle) Insert the sketch in the XZ plane, half of the longitudinal section of the drum handle, by rotating to the circular rod-shaped drum handle. Sketch 5: (fixing the bubble on the drumhead) Insert a sketch in the XZ plane, rotate to get the bubble body, mirror to the other side of the drumhead, and then array to the periphery of the drumhead. Sketch 6: (fixed drum nails) Insert a sketch in the XZ plane, rotate to get the bubble body, mirror to the other side of the drum. Step 2: Rotate the sketch to get the entity The rotation of the six sketches is very simple, so I won't go into details here. See the following figures for details. It should be emphasized that each entity is an independent entity, and the mandatory input selects the first base (red box), which is mainly for the subsequent more convenient entity coloring and surface property setting. The third step: making bubble nails through mirroring and array functions The side of the drum is used to mirror the foam of the hammer rope to the other side, and the YZ plane is the mirror plane. Then, the bubble stick fixed to the drumhead is mirrored to the drum surface on the other side, and the XY plane is a mirror plane, and copying is selected. Finally, the bubble heads of the fixed drumhead are circumferentially arrayed, refer to the following figure. The fourth step: the creation of drums and ropes Insert a reference plane between the foamed nail and the drumhead of the fixed drum rope. This reference plane is tangent to the drumhead surface. A sketch is inserted into the reference plane, and a slightly curved curve is formed in the direction of the drum drop. The length of the drum is about the drumhead. The sum of the radius and the thickness of the drum is half. Insert a reference plane at the end of the drum rope. This reference plane is perpendicular to the end of the rope. Insert a sketch on this reference plane and make a line of 120 degrees with a line length of 1 at the end of the rope (this is to do three strands). String). Exit the sketch. Perform the sweep, the parameters and effects are shown in the figure, and then the rod sweep, but the filter should select the "edge", so that a three-strand rope is completed. Make a small ball at the end of the rope as a drum hammer. Another drum hammer can move the mirror to the past or copy it. To make the ropes have different bending shapes, follow the above steps to make another one. Step 5: Post-processing rendering Hide or delete the sketch. The drum handle and the drum body are made of wood grain, and the drum hammer is a yellow ball, and a texture map is added for the drumhead. The results of the final rattle are as follows. The beautiful 3D CAD work of the rattle was born. Did it remind me of the memories of many friends? You are welcome to download Zhongwang 3D immediately and experience smooth and intelligent 3D CAD design. Zhongwang 3D's 3D CAD “By Learning†function can also help beginners get started quickly and create their own creative 3D CAD works!
Ultra Plantâ„¢ Grow Light offers One Chip Technology aimed to meet your indoor growing expectation such as improve plants' quality, increase yield, or better the margin, etc., all for helping you realize a higher return on your crops.
From Ultra Plantâ„¢ APP, you are able to schedule the growing process including photoperiod, brightness and spectral in advance. The lighting system will help you grow smarter, easier and better.
Grow Light On Herb,Herb For Grow Lights,Herb For Led Grow Lights,Best Herb For Grow Lights Feton Corporation , https://www.ultraplantgrowled.com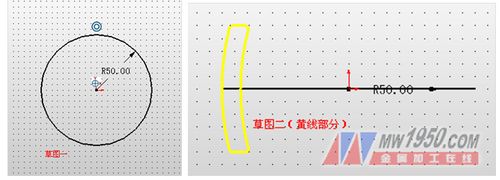
Ultra Plantâ„¢ Grow Light is combined our advanced All-In-One technology with patented optical design and customized light full spectrum supported from our experienced LED engineers, plant specialists and other partners working on horticulture.
Ultra Plantâ„¢ is the most versatile horticultural grow lighting fixture for indoor plants with flexible full spectrum, brightness control and uniform, wider light distribution, suitable for top lighting of all types of crops. No matter it applies to anywhere for any crop, Ultra Plantâ„¢ can do perfect work for you.